iSCSI (Internet Small Computer System Interface) is a protocol that uses underlying TCP/IP protocol for transmission of data. Unlike FC (Fiber Channel) which requires dedicated hardware like HBAs (Host Bus Adapters), fiber optics, etc., iSCSI uses existing network devices (routers, switches, firewalls) making it very cost effective storage solution. In iSCSI, data is transferred in block by block in raw form between the host and SAN. This makes operating systems to think as if the disk is locally connected or DAS (Direct Attached Storage). You can create LUNs (Logian Unit Numbers) or virtual disks in SAN which will be used by operating systems as a volume as if they were DAS. Note, NAS (Network Attached Storage) uses protocols like SMB, CIFS, or NFS to transfer data between operating systems and NAS device. In this post, I will show steps to configure iSCSI SAN in Server 2012 R2.
Configure iSCSI SAN in Server 2012 R2
Server 2012 now includes iSCSI software components, which means you can create SAN in server 2012. Two main components of iSCSI are, iSCSI initiators and iSCSI target. iSCSI initiator is a client or system that will be using the storage from SAN. iSCSI target is the SAN box or storage box or the server where iSCSI target component is installed. You can use Server 2012 iSCSI SAN feature to configure shared storage for fail-over clustering for Hyper V and VMware vSphere, and others. Now, let’s begin installing iSCSI in Server 2012. Here is my Vmware Workstation machine configuration.
The snapshot above shows the virtual machine configuration. The machine is configured with hard disk 2 and 3 each with 500 GB for iSCSI SAN configuration. I have already installed Server 2012 R2 in this machine with following configuration.
Now, follow these steps to install iSCSI target component in the server.
Step 1. From the Server Manager, click Manage and click Add Roles and Features.
Step 2. Click Next on Before you begin page.
Step 3. On select installation type page, select Role-based or feature-based installation and click Next button.
Step 4. On select destination server option, choose select a server from the server pool option and select the server. Click Next.
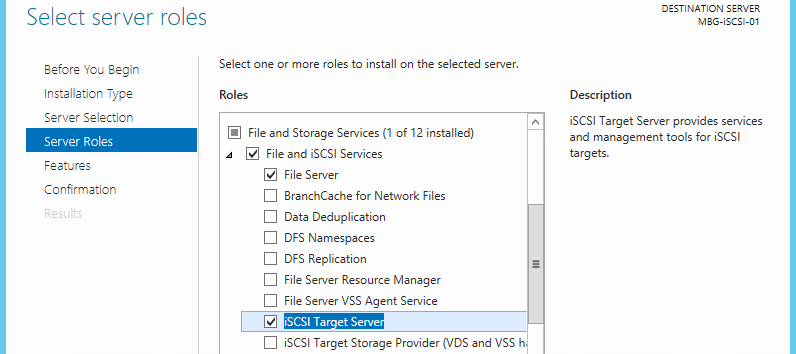
Step 5. On the select server roles page, expand File and Storage Services role, and again expand File and iSCSI Services feature, now select iSCSI Target Server feature. Then click Next.
Step 6. On features page, click Next without checking any feature.
Step 7. Review the confirmation page and click Install button.
Step 8. After the installation is complete, click Finish button.
We have successfully installed iSCSI target service in this server. Now before creating any virtual disks or LUNs we need to bring the disks online and create a NTFS partition on these disks. To bring the disks online, go to Server Manager, click File and Storage services tab, select Disks tab again, here you will see the lists of disks. Now right-click the disk and click Bring Online. Repeat this step for each disks. You will get a little warning after you click Bring Online, read it and click Yes.
Now create volumes in these disks. From the same window, right-click the disk and click New Volume.
New volume wizard will pop up. Click Next on before you begin page. Choose the server and disk and click Next.
Click OK on the warning.
Now specify the size of the volume and click Next.
Assign drive letter to the new volume and click Next.
Select file system and click Next.
Review the confirmation page and click Create.
Repeat the same step for other disk to create another volume. To view the volumes, click volumes tab.
Now the volumes are ready to be configured as LUNs or virtual disks. Now the last step is to create LUNs or virtual disks. In the Server Manager, select File and Storage services tab and then click iSCSI tab. Click Tasks and select New iSCSI Virtual Disk.
New iSCSI virtual disk wizard will open. Here, select the server and select volume and click Next.
Type name of the virtual disk. Here, I will give LUN-1 and click Next. As you can see below its a VHDX file, the same file format that Hyper V uses for virtual disks of Hyper V virtual machines.
Specify the virtual disk’s size. Choose the disk type, here I have chosen Dynamically expanding so that that the disk space won’t be over utilized. Click Next.
In the Assign iSCSI target page, choose new iSCSI target option and click Next.
Type the name for the new target.
In access servers tab, click Add button. Add initiator id dialog box will open. There are three ways you can identify the initiator (device that will use this virtual disk). Here I will choose IP and type the initiator IP of 192.168.80.80. Then click OK.
Here you can see the lists of iSCSI initiators. To add other iSCSI initiators click Add and repeat the steps above. Then click Next.
In the Enable Authentication page, you have option to use CHAP or reverse CHAP for authenticating iSCSI initiators and iSCSI target. Here, I will leave it empty and click Next.
Now review the configuration and click Create to create a new virtual disk or LUN.
After the installation you can view the virtual disks in iSCSI tab.
Now you can use these virtual disk in Hyper V or vSphere for various high availability purposes.


